Holy crap I had no idea when starting on my first fullsized ‘real’ quilt just how long it would take me. According to my notes I started the Bento Box quilt back in Nov 2010. It took almost 6 months to finish everything and while I know my actual active time on the project wasn’t that much it was still a big undertaking.
Back in Nov I had this pile of fabric to cut and piece together.

By early 2011 I had 20 completed blocks to cut up and rearrange.

Then in early April I finally tackled the border dilemma and knocked out the backing in 2 days.

Mid-April I bucked up and powered through the quilting. I may have spent some time cursing my ancient Singer and resisting the temptation to run to the nearest Bernina dealer to sooth my frustrations. Turns out that writing a huge tax check to the govt on a day when all you want to do is shop is AMAZING at killing that desire 🙂

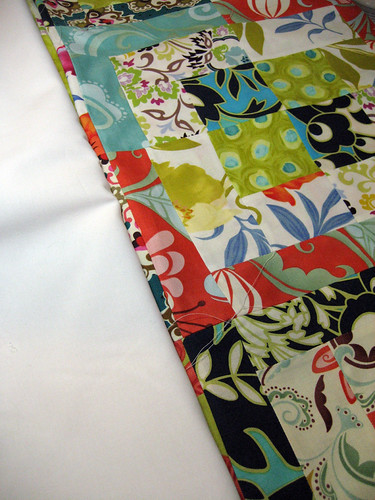
It’s done!
I attached the binding in one evening and only had to go back on a few sections to make sure the binding was attached in the back. I used the handy binding tutorial from Heather Bailey. The binding was a great way to use up some of my scraps from the quilt top and I still have plenty leftover for another project. This was my 3rd or 4th attempt at this method of attaching the binding and the 1st time it even looked remotely close to good.


I opted to go with a simple quilting design for each block and quilted 2 squares in the center and the outside round in each block. The borders were quilted 1/4″ off seam. Very simple and yet with my machine at times a serious hardship. At one point I took a break to relax with some popcorn only to come back and find a cat cozied up on the half finished quilt. I can only describe the look she gave me as ‘oh like anyone would believe you didn’t make this for me’.

The colors are crazy, the prints are chaotic, the learning curve was steep and considering that Nicki refused to move from the bed the moment I put it on for photos I think it meets his approval. It was totally worth it. I already have the Tube Quilt fabric prepped and ready for action. I’m on a roll.
Quilt Details:
Pattern: Bento Box Quilt (I didn’t buy the pattern but made up my own sizes based on flickr photos and available fabric)
Fabrics: Kaffe Fassett Zinnia (Aqua), Fandango Sarabande (Azul and Ole), Michael Miller Emmaline (Teal), Happy Go Lucky Trefoil (White), Fandango Valencia (Sand), Michael Miller Peeking Polka Dot (Lime and Aqua ),Amy Butler Daisy Chain Wildflowers (Navy), Michael Miller Poppy Skinny Stripes (Aqua and Spice), Kaufman Kona (White) plus two fabrics I picked up at the LQS and never made a note of the fabric name (the green with red leaves and the white with multicolored flowers and leaves).
Read Full Post »